Celery Kimchi

Born out of necessity as I suffer from a Kimchi addiction. At times when no Chinese Leaf is available, I used to get deranged in my withdrawal symptoms. So, upon receiving a job lot of celery in my veg box, I fermented it in the same way as I would Kimchi and a Star Was Born.

This is now my go to above and beyond conventional Kimchi.

Make it and there is no turning back

Ingredients:

2 Bunches Celery, finely chopped
20g Salt
1 Bunch Spring Onions, finely chopped
1 thumb Fresh Ginger, finely sliced
200g Carrot, cut into matchsticks
4 Cloves Garlic
1 Pear, roughly chopped
4 tbsp  ochugaru (Korean Pepper Flakes)
100ml Fish Sauce (substitute Miso for Vegan)
1 tbsp Demerara Sugar
1 tbsp Glutenous Rice Flour


Method:

1. Before you start it is important to recognise that no metal implements should be used in this process.
2. Add the salt to the celery in a large non-reactive bowl. Stir with your hands and set aside for 2 hours.
3. Gently rinse the celery and pop back into the bowl along with the spring onions and carrot.
4. In a blender, add the garlic, pear, gochugaru, fish sauce, sugar and rice flour, pulse until you get a thick paste.
5. Massage the paste into the vegetables really well, squeezing to release some juice.
6. Pack into sterilised kilner jars pushing down each layer so it is tightly compacted.
7. Once done, the top should be submerged in kimchi juice, if not, fill a bag with water and weigh down the top (or use a kimchi weight)
8. Allow to ferment with the lid attached for 3-4 days. It is imperative that you release the gas a couple of times each day by opening the lid.
9. Once you see bubbles, you can pop it in the fridge or continue the ferment for a few more days if you like a sourer taste.
10. Once in the fridge you can seal the lid without the need to release any gas as the fermentation rate is slowed.

Kimchi & Buckwheat salad, girl holding plate to back of frame, orange & purple tones, lawn in background

FERMENTATION GUIDE SOURDOUGH BASICS

Wow!​ The world of sourdough. It’s taken lockdown by storm and it’s all too easy to read ALL the information out there and get super, super confused with it all. My advice? STOP! Take one person, follow their exact recipe and stay with it, maybe even for months. Same loaf Every. Single. Time. This way you will get a feel for the dough, the technique and what it should look and smell like. Only then would I recommend playing around with different flours, hydrations, flavours and doughs. Another piece of advice that I would offer from personal experience is try and stick to the same Brand of flour. Different brands will be slightly different at absorbing liquid and even this will affect the nature of your dough.
Sourdough is phenomenal! Three ingredients: Flour, Water & Salt and you can create loaves worthy of the best bakery. The concept is that you harbour wild yeasts in the flour (and environment) and nurture them with food and water allowing them to grow alongside lactic acid producing bacteria. This produces what is termed the ‘Starter’. Your Starter is then used as a ‘Levan’ which is the raising agent required to create the carbon dioxide needed to stretch those gluten strands and create lovely air pockets. The lactic acid produces that wonderful tang we all know and love.
Getting Started: Your starter is literally fermented flour, that’s it! I prefer to make my starter out of Organic Rye Flour as it has a larger percentage of natural yeasts naturally present within it.

1. Mix equal parts water and flour. I recommend 100g water (25-28C approx.) with 100g flour. Leave this for 3 days covered with muslin.

2. Feed/refresh your starter: essentially the yeast will have ‘eaten & drunk’ all the food in the mix and will be hungry. So, you don’t exponentially increase your starter you will need to remove a portion and feed and water that.

3. So, take 30g of your original starter and add 100g flour & 100g water. Its easiest to dissolve your starter in the water before adding the flour. Cover as before and leave 24 hours.

4. Continue this for about 4 more days (so 7 days since you started). You will begin to see bubbles forming within the mix. This is great, it’s getting lively and active and ready to rise your bread!

5. You can test to see if it is active enough by filling a glass with water and adding a teaspoon of your starter. If it floats, you are good to go as it now contains enough carbon dioxide.

Bear in mind that these are only guidelines. Your starter is ready when its ready. It’s a wild organism and is affected by its environment. So, keep testing and only move on when you are sure that it is ready.

At this point you are ready to make a loaf. If, however, you don’t want to turn into a commercial bakery, you can rest your starter in the fridge where it will keep happily for about a week unfed. Then just feed it as before each week until you are ready to bake again. When you do want to bake with a refrigerated starter, you’ll need to bring it up to room temperature and feed it so it’s nice and active. I recommend doing this the day before you bake.

Right! Let’s bake bread! You are aware that bread requires gluten to be able to rise and expand. Gluten is essentially a mix of proteins which unravel and combine again with viscoelastic and adhesive qualities which can then trap the carbon dioxide created from the respiration of the yeast. This is what causes your loaf to rise. In order to allow this, you’llneed to start with a flour that has a protein content of between 11-13% which is generally termed ‘Strong Bread Flour’ there are ways to make bread using lower protein contents but we will not focus on that here.

I recommend starting with a white loaf as it is easier to work with.

1. To start, mix 100g of your starter with 350g lukewarm water. Make sure the starter is completely dissolved (you can squelch it in your hands).

2. Mix in 550g Strong White Bread Flour until all the flour is combined but the mix is rough and shaggy. Now LEAVE IT.

3. Cover the dough with a tea towel and leave for 30 minutes. This stage is termed the ‘Autolyse’ and allows for all the flour to become properly hydrated with the liquid. This kick starts the whole process of making your dough and will make life a lot easier later.

4. Mix 12g fine salt (without caking agent) in 25g water and pour over your dough. Incorporate this using your hands (the mix will be sticky) and transfer to an oiled bowl.

5. Again, cover and leave for 1 hour to rest.

6. Now to ‘Fold’ your bread. Essentially, folding is a way of kneading the dough, without all the effort. The action of folding will help the gluten form and the bonds will be strengthened by the lactic acid produced by the bacteria.

7. To fold the dough, I find it easiest to see it as a square. Take the flat side opposite you, pull it up and towardsyou to meet the opposite side. Turn the bowl 90 degrees and repeat. Do this for all 4 sides of the dough, as if you are folding the sides of a square. It is easiest to do this with slightly wet/oiled hands.

8. Rest the dough, covered, for an hour.

9. Repeat these 5 more times so the dough has had a total of 6 folds, 1 per 30 mins.

10. After the final fold, leave your dough for another 30 mins.

Now it’s time to shape the dough. Turn the dough onto your surface and, using a scraper, or the side of your hand, you will need to ‘tension’ the dough. This will create a nice smooth ‘skin’ on your dough so it is not as sticky. This involves sweeping under and round the dough several times to pull it into a ball. Each time the surface will become tighter and less shaggy.

Once the ball is smooth, leave it, uncovered for 30 minutes.

To shape the dough, lightly flour your surface, flip the dough over and ‘knit your dough together’ I see this as starting at the ‘top’ of the ball and pinching sections over each other as if performing a braid. Once you reach the opposite side, turn the dough 90 degrees and repeat. Do this twice more. All this is doing is ensuring your dough is nice and tight and rises evenly in the oven.

Take a colander or Banneton and lay a clean tea towel inside. Liberally dust this with flour and lay your dough in it, seam side up. Leave uncovered for 1 hour to begin to rise, then cover and pop in the fridge for its ‘bulk fermentation’ ideally this should be 12-14 hours.

The next day YOU CAN BAKE!

1. Preheat your oven as hot as it can go for 30 minutes. If you have one, put a lidded cast iron casserole dish inside to become super-hot.

2. Once hot, carefully remove the casserole and the lid and sprinkle in some polenta/semolina/flour to stop your loaf from sticking.

3. Uncover your loaf and carefully invert it into the pot so the seam is underneath. You’ll need to be confident in this, one flip and its in.

4. With a razor, or super sharp knife, score the dough to allow it to expand evenly. A few slashes are fine. Turn the oven down to 230C.

5. Bake your loaf for 25 minutes, remove the lid and reduce the temperature to 220C. bake for 20-25 minutes or until a nice crust has formed.

6. Remove from the oven and cool completely on a wire rack.

7. Don’t be tempted to eat this while its hot! By cooling completely, you are allowing the moisture to distribute so you have a lighter loaf, cutting it too early will compact it and make it squishy. ITS WORTH WAITING FOR!

Now you are all the boss of fermentation! You can ensure you have great food and a happy tum at a fraction of the cost of store-bought products! YAY!

girl holding wooden bowl in hand with long brown knitted sweater sleeves

FERMENTATION GUIDES KOMBUCHA

Essentially, Kombucha is fermented iced tea that makes a fantastic replacement for fizzy/ alcoholic drinks. You can drink it as it is or flavour it with any fruit/ vegetable scraps you have lying around and, once you get around the somewhat ‘ugly’ nature of the ferment, it really is quite phenomenal to watch.

After your initial outlay for the SCOBY, its cheap and so much more economical than store bought Kombucha (I once paid £7 for a 350ml bottle!!).

Similar to Apple Cider Vinegar, Kombucha is made using a ‘mother’ or SCOBY. This stands for Symbiotic Culture Of Bacteria & Yeast. Akin to a disfigured stingray/jellyfish, it’snot the most attractive thing, but it will give you the most delicious drink so nurture it!

Once you get started, your SCOBY will grow prolifically, creating a new ‘baby’ each time a new batch is brewed. Hurrah! This means you can share round your fermentation love with all of your friends!

To begin, you will need to get hold of a SCOBY. If you are lucky enough to know someone that brews Kombucha, then go right ahead, just ask for about 500ml of their Kombucha with it so you can kick start your own batch. Otherwise, I would recommend either buying on Amazon (which is what I did) or there are plenty of forums where people are all too willing to offload their SCOBY babies.

The concept is simple. You are using your SCOBY to turn the sugar in sweetened tea into an effervescent probiotic drink. The tea you start off with will affect the ultimate flavour and colour of your kombucha. You can use Black, Green or White Tea (I favour Japanese Green Tea, but be warned, this will cause a green ‘pond scum’ on your SCOBY so don’t be alarmed). You will need to begin with a Sterile 5 litre fermentation jar. This can be anything, even a bucket but you CANNOT USE ANYTHING METAL near a SCOBY. This goes for all your equipment too. So, you will also need: a plastic spoon, sieve, glass bottle and some muslin and string.

1. Measure 1 litre boiling water into a heatproof container. Stir in 260-300g sugar and 4tbsp tea leaves (or use about 10 tea bags). Allow to brew to 20 minutes (no more or your mix will be too bitter).

2. Add 3 litres of cold filtered water into your fermentation jar and, using your plastic sieve, strain in the sweet tea.

3. Add your SCOBY and its liquid to the jar, allowing it to float on the top. It might sink just a little but this is fine, it will stay where it is happy. Cover your jar with muslin to keep out any dust and secure with string or an elastic band.

4. Place somewhere warm, but not in direct sunlight and……leave it alone! Yep, for at least 6 days just forget about it. All different things will affect your fermentation rate and it really is all down to the individual mix and your taste.

5. After 6 days, taste the liquid. It should have balanced sweet and sourness. Continue checking every 3 days. I prefer mine slightly more sour than sweet but it’s entirely up to you. (at this point you can leave your kombucha to go ‘over’ for 4-8 weeks and you will get a beautiful Kombucha Vinegar for Salad dressings etc).

6. When it is to your taste, strain it through a muslin and plastic sieve into sterilised bottles and store in the fridge. The SCOBY should be kept with 500ml of the liquid and either used to start your second batch or stored in a plastic Tupperware in the fridge. It will keep like this for several months.

7. If, like me, you prefer your Kombucha with a touch of fizz, you’ll need to kick start a secondary fermentation. It is at this point that you can also introduce flavour into your mix.

8. Once you’ve bottled the mix, you’ll need to add 1 tbsp of sugar per litre to kick start the secondary fermentation. At this point you can also add some fruit or vegetable scraps such as ginger/orange peel/apple etc. I prefer to add flavour to each individual glass so I can change it up. For this I recommend homemade fruit, spice or flower syrups. Aim to add about 50g flavourings per litre.

9. Add tight lids to the bottles and leave them at room temperature. Every day you will need to ‘burp’ the bottles by briefly removing the lid to release the gas. Taste each day for up to 6 days until the carbonation is to your liking.

10. Once ready, refrigerate and drink within a month.

It really is that simple. Leave it alone and it will do all the hard work for you! And the great thing is, if you want to take a break your SCOBY will be super happy just chilling out in the fridge, the perfect low maintenance pet!

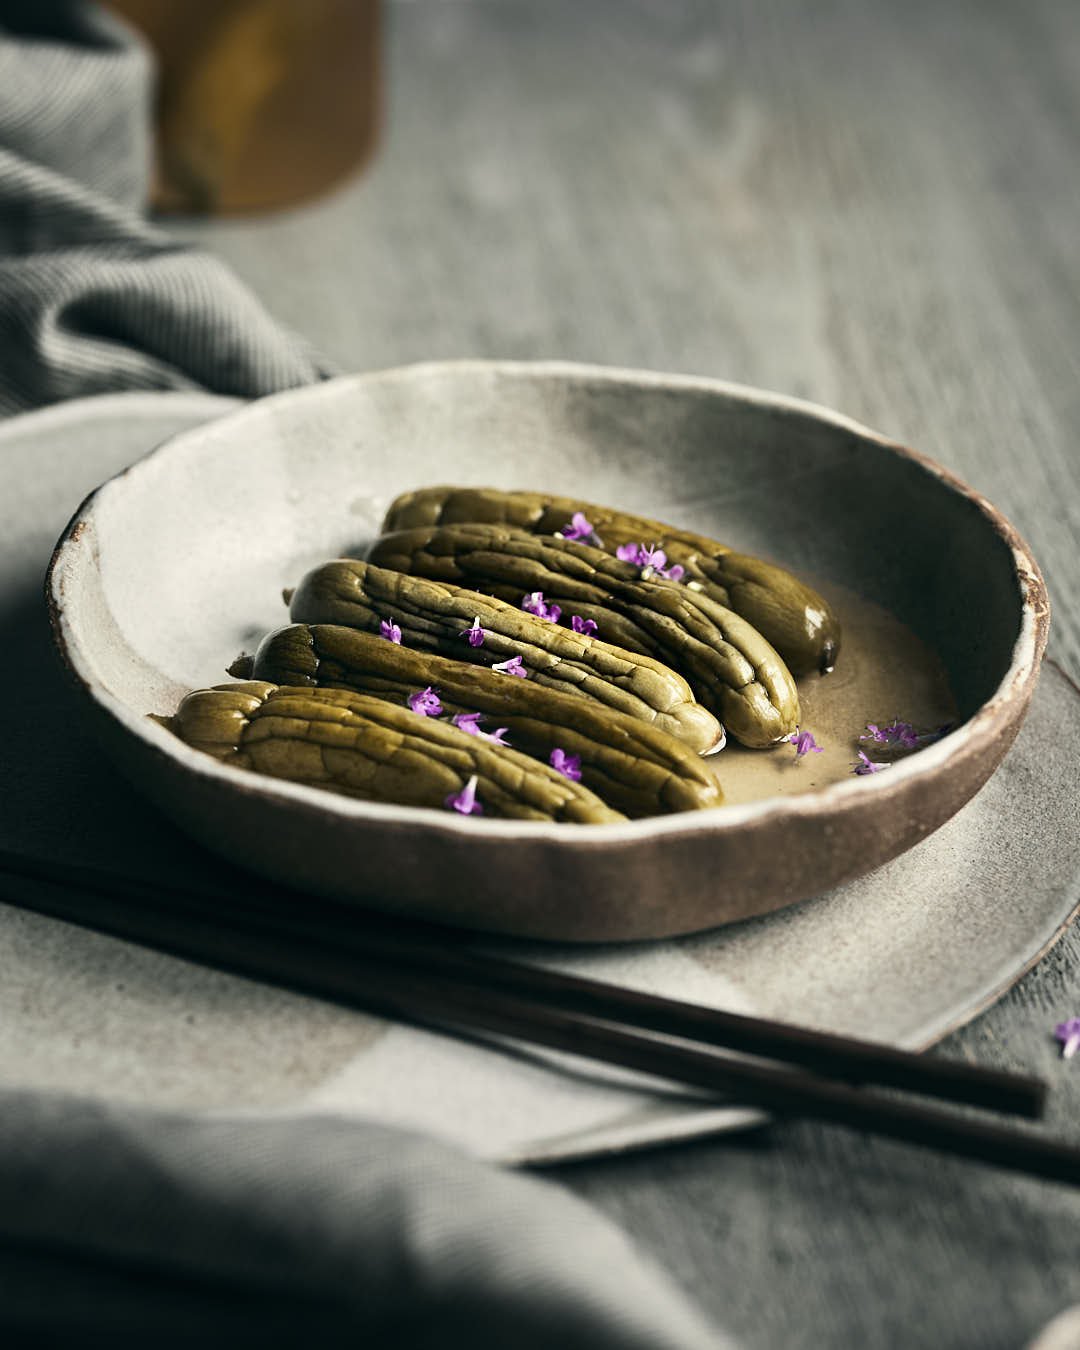
FERMENTATION GUIDES FERMENTED CUCUMBERS

‘Fermentation may have been a better invention than fire’ David Wallace


Fermentation harnesses the power of Nature to preserve beyond the boundaries of seasonality. Fresh homegrown summer cucumbers take on a piquancy that is suggestive of their tine in the sun, well into the months of the hunger gap where little grows aside from root vegetables.


These are the perfect addition to roast potatoes, noodles, rice and salads, anything goes.


Ingredients:


500g Mini Cucumbers, whole

100ml Elderflower Vinegar

70g Golden Caster Sugar

10g Flaky Sea Salt

1tsp Thyme Leaves

60ml Shaoxing Wine


Method:


1.     It couldn’t be simpler. Arrange the cucumbers in a single layer, snugly nestled next to each other in a shallow dish.

2.     Mix the remaining ingredients together in a bowl and pour over. Pop a plate over the top and sit somewhere dark and relatively cool but room temperature for 3 days. Each day, give the dish a little shake to ensure the cucumbers stay wet.

3.     As they ferment, they will become wrinkled and the liquid will increase, this is normal. Transfer the cucumbers and their fermentation liquid to a sterile kilner jar and seal the lid.

4.     Pop this in the fridge and allow to develop for a week. Your cucumbers are now ready!  Discard the brine after a week and keep the remaining cucumbers in an airtight box for a month, but they never last that long!

Bowl of five fermented cucumbers with purple thyme flowers on grey wooden table

bowl with 5 fermented cucumbers with purple thyme leaves on grey wooden atble